Hey everyone!
Some weeks ago I started sharing my trades on the Chart Art topic. I’ll now take the advice I got from one of the comments and share the progress in a single thread here!
As you can see below, the journey has started in a quite choppy form, however, that’s trading! I’m prepared to take a few attempts at the challenge as any strategy can go into a drawdown or a winning streak at any moment. Since I mainly trade on the daily and 4-hour chart, trade setups tend to take a while to appear and develop.
The risk management strategy I’m following is to go with a slightly more aggressive approach and trade with a 1% risk per trade. This will be limited to the challenge phases, and once the funded account is achieved, I’ll drop the risk down to 0.5% per trade to go into capital preservation mode.
I intend to add more accounts with time, however, let’s focus on the first one haha. Since this is a catch-up first post, I’ll reference the trades and insights I’ve posted on TradingView since I started the challenge. Here is the last trade taken:
From TradingView
Hey all!
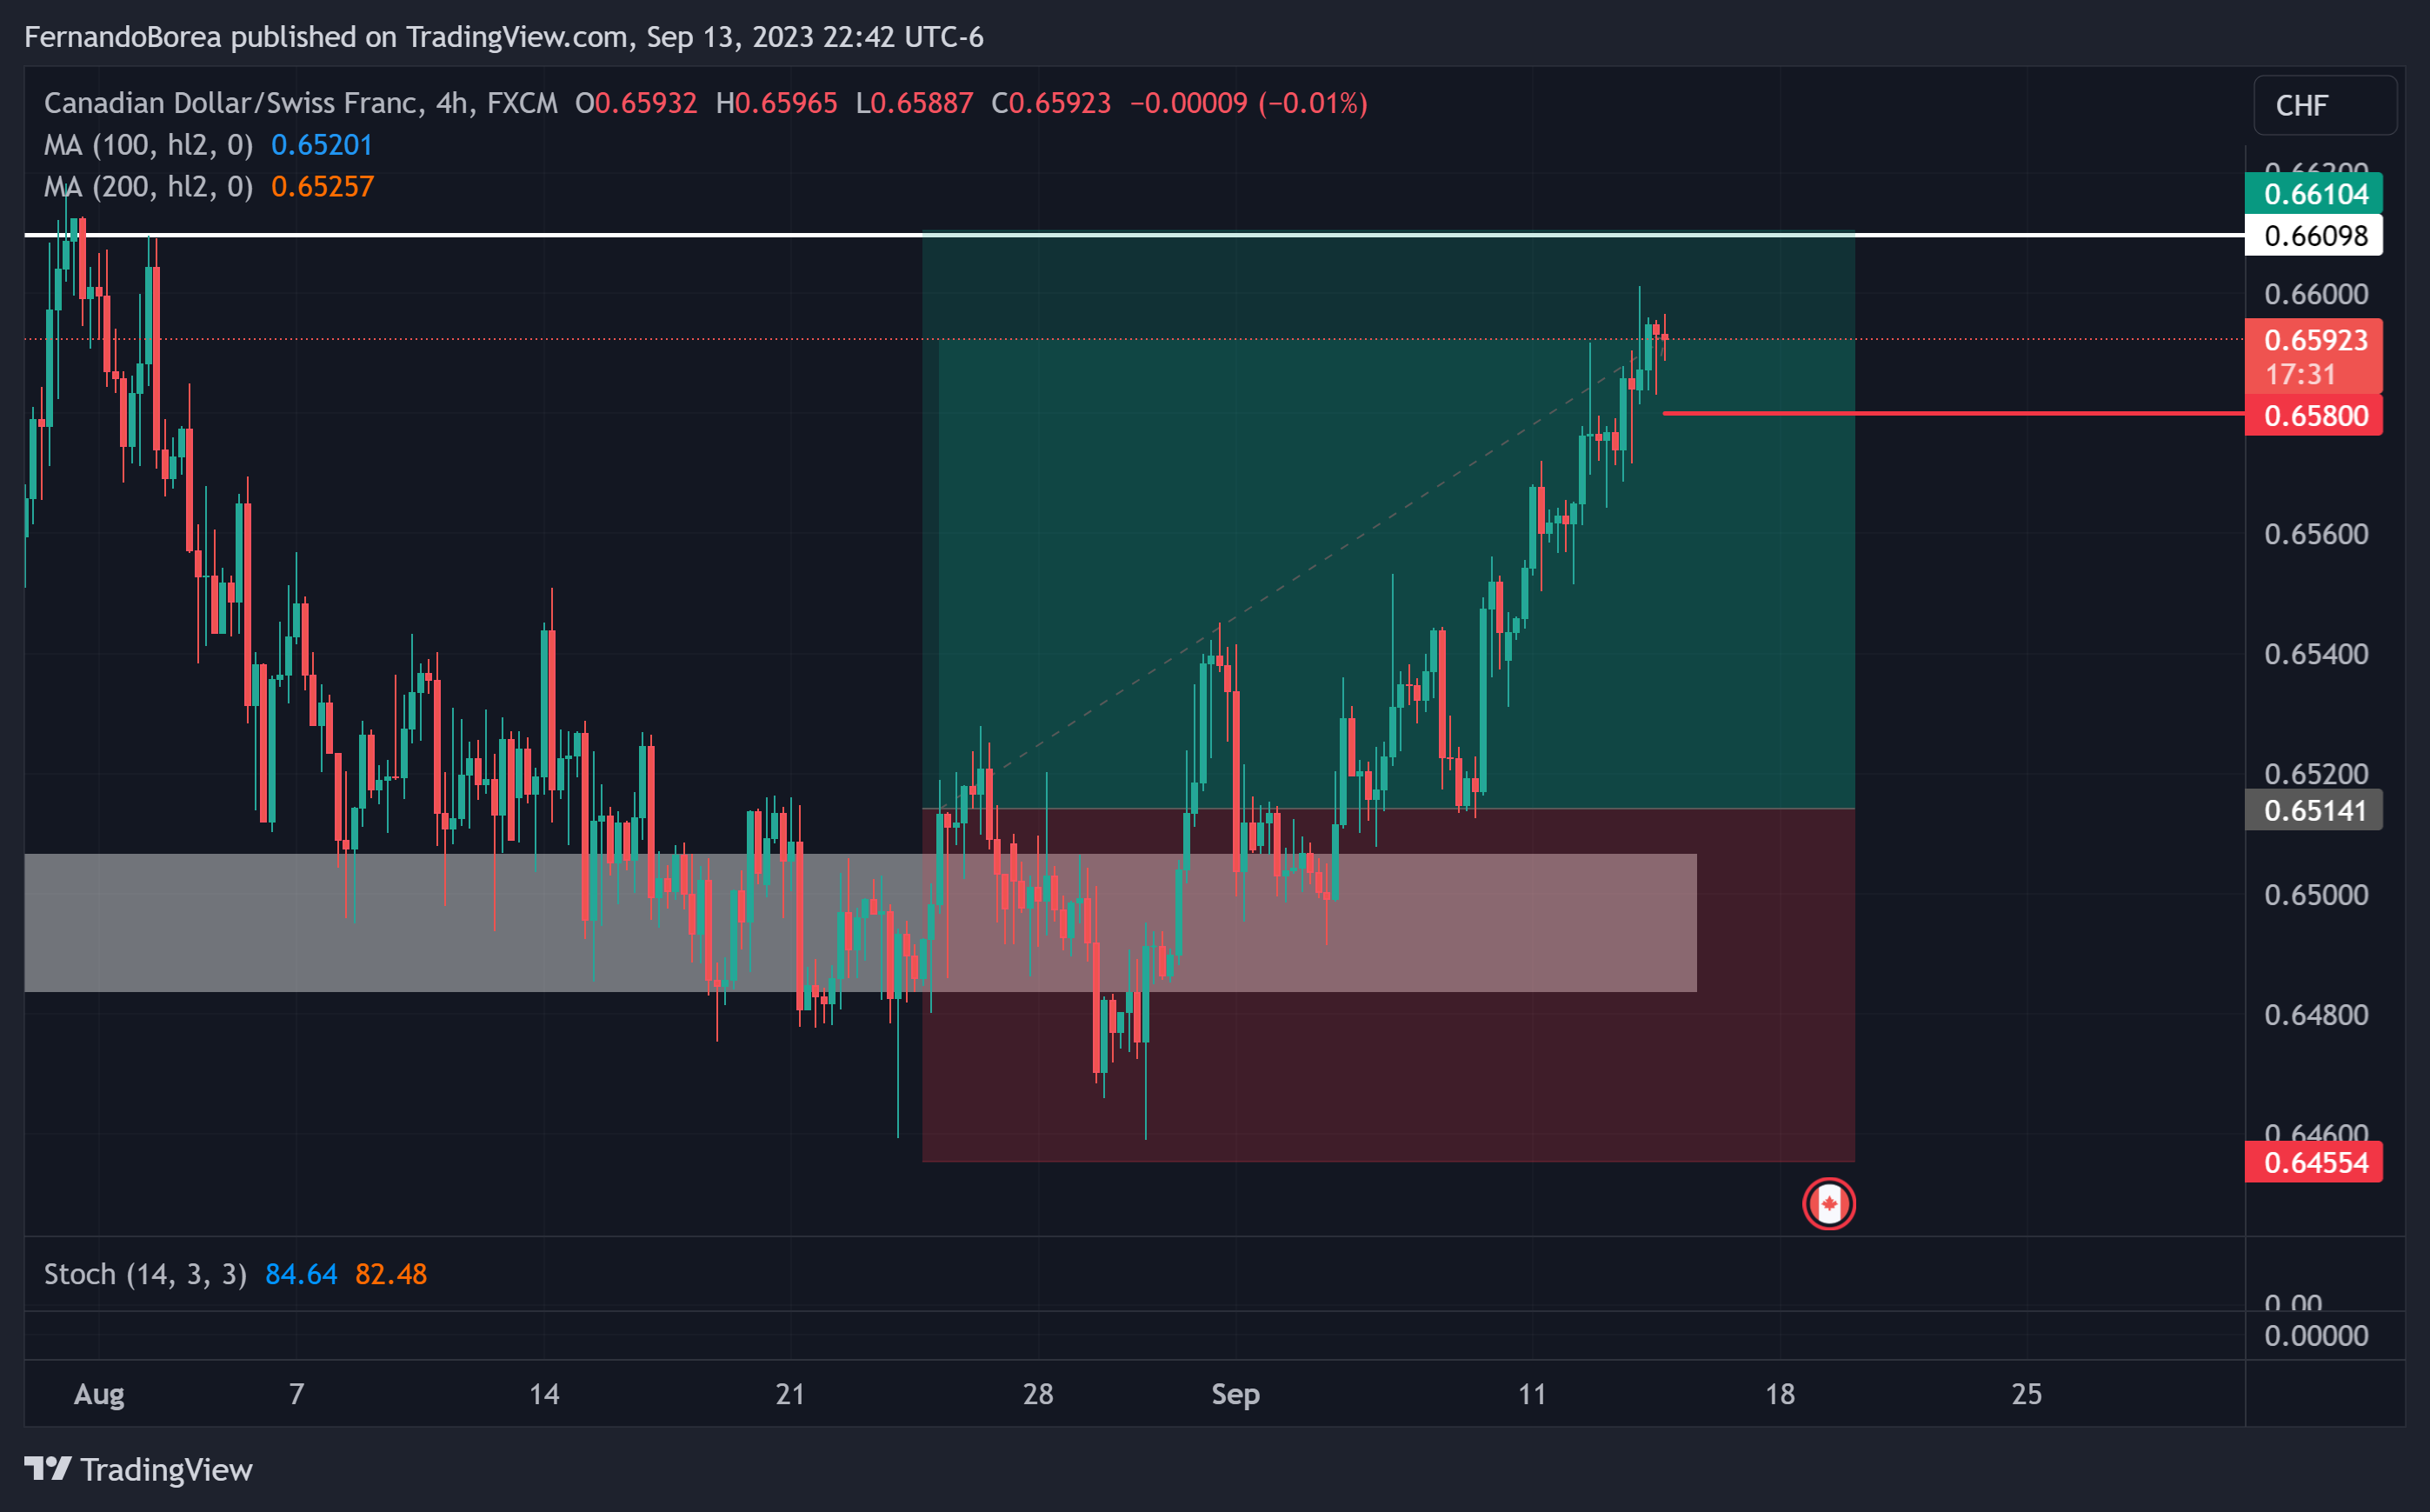
And we’re back to this pair! After the stop-loss I had here, I consider there’s an interesting opportunity here for a shift in structure. Personally, I think there can be a bearish extension reaching into the nearest support area.
Anyway, here are the notes from da’ journal!
The market has been in an uptrend for almost a year. Recently, the uptrend structure was broken, moving the market below a bullish trendline, as well as below a resistance that was apparently broken but that failed to test the breakup.
We recently saw a strong bearish movement below that resistance, which supports the potential shift in structure. The stop loss is placed above the last high, and the first profit target is set to the next major support area. The second profit target will remain open in case the market shows strong bearish momentum when reaching the first one.
Previous posts
1- $100k Challenge - USDCHF Short - E1 T1 for FX:USDCHF by FernandoBorea — TradingView
2- $100k Challenge - AUDCAD Long - E2 T1 for FX:AUDCAD by FernandoBorea — TradingView
3- $100k Challenge - GBPUSD Long - E3 T1 for FX:GBPUSD by FernandoBorea — TradingView
4- $100k Challenge - CADJPY Short - E4 T1 for FX:CADJPY by FernandoBorea — TradingView
5- $100k Challenge - EURAUD Short - E5 T1 (Hindsight trade) for FX:EURAUD by FernandoBorea — TradingView
6- $100k Challenge - USDCAD Short - E6 T1 for FOREXCOM:USDCAD by FernandoBorea — TradingView
7- $100k Challenge - GBPUSD Long - E7 T1 - Trade follow-up for FX:GBPUSD by FernandoBorea — TradingView
8- $100k Challenge - AUDCAD Long - E8 T1 - Trade follow-up for FX:AUDCAD by FernandoBorea — TradingView
9- $100k Challenge - Weekly Self Review - E9 T1 07/08 ~ 11/08 for FX:AUDCHF by FernandoBorea — TradingView
10- $100k Challenge - AUDCAD Long - E10 T1 - Trade Review for FX:AUDCAD by FernandoBorea — TradingView
11- $100k Challenge - USDCAD Long - E11 T1 - Trade Review for FOREXCOM:USDCAD by FernandoBorea — TradingView
12- $100k Challenge - CADCHF Long - E12 T1 for FX:CADCHF by FernandoBorea — TradingView
13- $100k Challenge - USDCHF Long - E13 T1 - Trade Review for FX:USDCHF by FernandoBorea — TradingView
14- $100k Challenge - GBPUSD Long - E14 T1 - Trade Review for FX:GBPUSD by FernandoBorea — TradingView
15- $100k Challenge - (Bi)Weekly Self Review 14/08 ~ 25/08 - E15 T1 for FX:AUDCHF by FernandoBorea — TradingView
16- $100k Challenge - GBPUSD Short - E16 T1 for FX:GBPUSD by FernandoBorea — TradingView
1 Like
Trade Review
Hey all!
Well, another hit to the challenge haha. This was one of the first few trades taken for the challenge, however, the CADCHF trade is effectively acting as sort of a hedge to this position, so it’s a matter of monitoring how that trade evolves.
Regarding this specific setup, originally I missed a few patterns that made this entry not so ideal, however, in the end, we did see an initial bearish rejection from the resistance that just didn’t manage to have enough momentum for pushing this trade into profits. So, I’m comfortable flagging this trade as just another regular SL of the system.
Anyway, that’s it for this update!
Hey all!
Finally some positive updates for the challenge!
Trade update: CADCHF Long
In today’s trading session, I noticed the market started to struggle to maintain bullish progress on the H4 chart around the TP1 area. Because of this, I modified the management strategy for this trade a bit. Upon reviewing the H1 chart for microstructure, I noticed an ascending channel. With this formation in mind, I decided to update the stop loss of the first half of the trade to be just below the ascending channel, so in case we have a bearish break of structure before hitting the first profit target, we are still out for a good movement in our favor.
This effectively guarantees the first profitable trade of the challenge, therefore, I also made the decision to move the SL of the second half of the trade to break even, locking in a positive result for this trade idea.
H1
H4
TradingView Idea update: $100k Challenge - CADCHF Long - E18 T1 - Trade Update for FX:CADCHF by FernandoBorea — TradingView
Hey!
Got some more updates on this trade!
Trade update: CADCHF Long
We had a TP1 hit on this trade. The market seems to have successfully broken the resistance area where the first profit target was located, so I took the decision to move the SL for the trade below the new potential support to lock in a larger portion of the profits.
H4
TradingView Idea update: $100k Challenge - CADCHF Long - E19 T1 - Trade Update for FX:CADCHF by FernandoBorea — TradingView
Hey all!
Some more updates on the challenge!
Trade update: CADCHF Long
I noticed some price action signals of bearish presence at a minor daily area of interest. Mainly, an H4 bar that had a long upper wick on a bearish bar with a lack of bullish continuation. After evaluating the market on H1, this could either be a normal retest of the H1 bullish trendline or signs of a breakdown. Because of this, I decided to move the SL around 2ATR below the last low on the H1 chart.
H1
H4
TradingView Idea update: $100k Challenge - CADCHF Long - E20 T1 - Trade Update for FX:CADCHF by FernandoBorea — TradingView
Periodic Self-Review
Hey all!
Since I’ve focused on higher-quality trading opportunities, there has been little trading activity since the last self-review, so I decided to make it until I feel there are significant notes to take. Find below the latest notes from the journal!
In this trading period, only some new trades have been executed, it has been mainly dedicated to properly managing existing positions and analyzing previous mistakes and improvement areas.
The main mistakes detected so far have been around executing the trades too early and not considering signals and patterns that lower the overall trade quality.
Through the self-awareness of these trading mistakes, I noticed they can be boiled down to FOMO, and I started asking relevant questions before executing a trade to fix this, mainly these questions have been:
- Am I taking this decision because of what the market is showing on the chart?
- Am I missing something before I execute this trade?
- Is there a better way to trade this setup?
This has resulted in fewer trades, making complete sense as the main time frames are Daily and H4. The trade quality has improved significantly as the mindset now is “A great trade is worth more than 100 mediocre ones”.
TradingView Post: $100k Challenge - Periodic Self Review 26/08 ~ 24/09 - E21 T1 for FX:AUDCHF by FernandoBorea — TradingView
Is this 1% of supposed capital ie $100k or 1% of total drawdown which is your real account?
Bear in mind that 1% of $100k is probably 10% of your drawdown.
2 Likes
Great observations!
I’m currently using 1% of the total account, or ~10% of the ‘available’ drawdown. I plan to reduce the risk per trade to 0.5% or 5% of the ‘available’ drawdown, as I’d require over 20 negative trades in a row to lose the live account, which is worst than the worst I’ve gone through so far.
Regarding the challenge, I’m going with a higher risk so I can complete it faster, I’m aware the risk of failing the challenge is higher, but I’m okay with that as I’m prepare to retake it up to 3 times before making a pause and evaluate the strategy.
The big picture plan is to build a portfolio of live accounts with time.
Any feedback and recommendations are welcome!
Trade update: CADCHF Long
Hey all!
Great news for the challenge, we have our first winner officially locked down! Today, after about a month of letting the trade run, I decided to close out completely the CADCHF position as we approach a daily resistance for over a 4:1 risk reward! 
As always, here are the notes from the journal!
During today’s monitoring session I noticed the market approached the daily resistance area at around 0.6795, as the market moved towards that price zone, the H1 timeframe started showing signs of slowing down as well as the H4 timeframe.
As the trade has been running for over a month and we are at a great risk-to-reward position, I have decided to close out the second half of the trade and monitor if the market breaks up from the resistance area to consider another potential entry on that case rather than keeping the current position open.
H4
H1
As long as you are aware that you are taking a bit of a gamble and treating it as a calculated ‘punt’.
I wish you good luck with you endeavour.
Totally!
As you said, it’s kind of a calculated gamble to get funded. From there I’d transition to a more capital preservation priority.
Yes, as an ex-professional horse race bettor I can appreciate the cunning plotting of a ‘big coup’ 
Sometimes fortune favours the brave!
Here is a Tom Hougaard video of him pulling off a ‘big one’ You may find it of interest.
3 Likes
Absolutely hahaha!
Thanks for sharing! I’ll have a look at it, if double digits a month are surprising, 5 digits in a day seems like a home run session haha.
1 Like
Trade update: GBPUSD Short
Hey all!
I decided to lock in part of the profits of the open GBPUSD short trade, as always, here are the notes from the trading journal, enjoy!
In today’s monitoring session, I noticed the market started to retrace a bit after making a bearish breakout of a descending channel. I consider it the start of a normal market retracement, for this reason, I’ll stick to the original trade plan with only one slight change, I decided to move the stop loss slightly above the last secondary area to lock in part of the profits while maintaining the first profit target at the daily support zone.
D1
New Trade! NZDCHF Short
Hey all!
After a long period without a good set-up for the time frames I trade on (and a couple of missed entries), we have a new position for the challenge! I hope you enjoy the notes from the journal:
Overall the market has maintained a constant bearish structure, drifting in favor of the safe-haven Swiss Franc, it leads me to believe there might be some fundamentals favoring a risk-off environment, but honestly, I have focused mainly on the technicals as time for catching up with fundamentals has been limited.
After the market tested the last lower low, it strongly rejected the area, leaving us with strong selling pressure clues, both on the H4 and the Daily. On top of this, the technicals I follow do signal a potential continuation, so I decided to take this short trade.
The stop loss is located slightly above the last high, which is an unconventional approach as it’s within the descending channel, however, my logic for this is that if the market pushes to the upper bound of the channel, I’d rather consider a second entry with a way better risk-reward, and have a tighter initial SL now in favor of a > 1:2 take profit 1. Kind of a risky move, but personally I think it’s worth it.
Regarding trade management, a standard approach of TP1 is located at the nearest support, and TP2 is open. Risk-wise, we’re sticking to the original 1% per trade risk management.
D1
H4
TradingView Posting: $100k Challenge - NZDCHF Short - E24 T1 for FX:NZDCHF by FernandoBorea — TradingView
New Trade! EURGBP Short
Hey all!
We do have a new trade today! Honestly, I consider this to be a B-grade setup that is still worth taking. Anyways, I’ll leave the details to the notes from the trading journal, enjoy!
The Daily timeframe shows a visit to a descending trendline that has been valid since the beginning of 2023. Even though the market showed a strong bullish presence when initially testing the trade level, the progress halted almost immediately and signs of failed attempts from buyers to keep the upper hand started to show in the form of several daily candles printing long upper wicks.
On the H4 timeframe (the main one used for this trade idea) we can see how the market started to print lower highs and form a support area that ended up breaking, with a recent close below the last low on said support.
Overall I consider this to be a B-grade setup that is still worth taking. This is because the entry is generated under the daily bearish trend line, forcing the SL to be placed based on the H4 levels, causing the SL to be within range of another visit to the daily trendline, keeping an overall bearish structure but stopping out the trade, also, it is taken a couple of days before GDP news for the British Pound.
However, the setup offers a risk-reward of 1:3, and the overall forecast of the monthly GDP report is positive for the Pound, which would cause a bearish movement on this pair, and would also work as a hedge for our current GBPUSD active position. Regarding profit targets, the approach remains standard, the first target sits at the last daily support area and the second one remains open in case we see a strong bearish presence when the market reaches that price zone.
D1
H4
TradingView Posting: $100k Challenge - EURGBP Short - E25 T1 for FX:EURGBP by FernandoBorea — TradingView
Trade Review: EURGBP Short
Hey all!
Well, we do have an update on the challenge, I think this trade gave me some really valuable insights to apply through the funding challenge and overall through my trading career. Soooo, to the notes from the journal!
This trade ended up stopping out a few days ago. Overall, I think this is a good example of a trade that followed a plan correctly, but the plan could have been better. When executing this position I was aware of it being not-so-good but might be worth the shot, however, in hindsight, the main insight I gained through this SL is that it doesn’t matter how big the risk-reward might be, what really matters is the setup quality, I’m trading to take a handful on high-quality positions, not to take many “decent enough” setups that I found a way to “make them worth it”, and the main lesson here is that I should keep in mind closely that mindset.
H4:
TradingView Posting: $100k Challenge - EURGBP Short - T26 T1 - Trade Review for FX:EURGBP by FernandoBorea — TradingView
2 Likes
I’m very keen to see you pull this gamble off.
Though I shouldn’t be encouraging gambling. 
Good luck!
2 Likes
Thanks Johnny!!
I appreciate it, I think everyone can appreciate a calculated gamble 
Slow and steady, let’s see where that takes the challenge hahaha. It’ll take a few months to complete and that’s fine, once the first funded account is achieved I’ll definitely take on a few more to keep the portfolio growing.
Trade udpate: NZDCHF Short
Hey everyone!
Great news, the NZDCHF trade has officially reached the first profit target! These are great news for the challenge. As always, find below some notes from the trading journal!
We achieved the first profit target with ease, the market has shown extreme bearish signs with little signals of exhaustion. I’m sticking to the original trade plan of leaving the second half open and constantly monitoring how the market behaves. Regarding the SL, I have decided to move it 1ATR above the last swing high.
H4
TradingView Posting: $100k Challenge - NZDCHD Short - E27 T1 - Trade Update for FX:NZDCHF by FernandoBorea — TradingView