The Australian dollar is under pressure against the Japanese yen as bullish momentum stalls near key resistance, highlighting downside risks for AUD/JPY.
By : Matt Simpson, Market Analyst
The Australian dollar is struggling to maintain upward momentum against the Japanese yen, with AUD/JPY failing to follow through on a bullish setup despite a broader risk-on rebound. After carving out a bullish hammer and range expansion above 92.00 last week, bulls were eyeing a move toward 95.50 and 96.00. Yet, recent price action has turned cautious. Tuesday’s bearish engulfing candle and a failure to hold gains above the 20-day EMA and SMA suggest bearish pressure is building. A downside break beneath 93.70 could expose deeper support levels as short-term sentiment shifts.
View related analysis:
- EUR/USD Bulls Gain Ground, NZD/USD Bullish Bets Surge: COT report
- Crude Oil Crashes as Iran’s Muted Response Fuels Wall Street Rebound
- AUD/USD Weekly Outlook: Aussie Slides as Oil Surges on Middle East Tensions
- AUD/JPY Eyes Breakout as Bulls Defend Support Ahead of Jobs Data
AUD/JPY Technical Analysis: Australian Dollar vs Japanese Yen
Last week, I outlined a bullish bias for AUD/JPY, targeting a move towards 95.50 and 96.00. The bullish hammer above 92.00 and subsequent bullish range expansion day looked promising—especially with an inverted head and shoulders (H&S) pattern forming on the 1-hour chart. However, four days later, bullish momentum has failed to follow through, and Japanese yen bears may now have a slight upper hand over the Australian dollar.
The daily chart for AUD/JPY shows a small bearish engulfing candle forming on Tuesday, following a wide-legged Doji that signalled elevated volatility within the recent sideways range. This pattern has ultimately resolved with a dip lower. The failure of AUD/JPY to rally during a broader risk-on rebound also raises a red flag, and puts a potential downside break firmly on the radar.
A break beneath 93.70 would see prices beneath its recent range and also clear the 20-day SMA and EMA to suggest a countertrend move is on the cards.

Click the website link below to read our exclusive Guide to AUD/USD trading in Q2 2025
https://www.cityindex.com/en-au/market-outlooks-2025/q2-aud-usd-outlook/

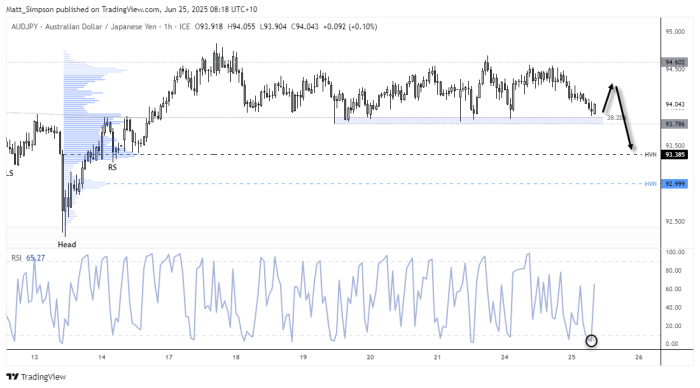
AUD/JPY Technical Analysis: 1-Hour Chart
The 1-hour chart shows AUD/JPY has been oscillating between the 93.80–94.75 zone over the past week. Prices have drifted toward the lower bounds of that range, though AUD/JPY is attempting to carve out a swing low above the 38.2% Fibonacci retracement level.
Given the 1-hour RSI (2) reached an extremely oversold reading of 3.2 overnight, the bias is for a minor bounce before prices potentially break lower from the range. Bears could look to fade into intraday rallies if a swing high appears to form on the 1-hour chart.
Click the website link below to read our exclusive Guide to USD/JPY trading in Q2 2025
https://www.cityindex.com/en-au/market-outlooks-2025/q2-usd-jpy-outlook/

Economic Events in Focus (AEST / GMT+10)
08:00 NZD Trade Balance (May), Exports, Imports (NZD/USD, NZX 50)
09:50 JPY BoJ Summary of Opinions, Corporate Services Price Index (CSPI) (YoY) (USD/JPY, Nikkei 225)
10:15 USD Fed Schmid Speaks (USD, S&P 500, Nasdaq 100, Dow Jones, Gold, Crude Oil)
11:00 JPY BoJ Tamura Speaks (USD/JPY, Nikkei 225)
11:30 AUD Weighted Mean CPI (YoY) (May) (AUD/USD, ASX 200)
14:00 GBP Car Registration (MoM, YoY) (May) (GBP/USD, FTSE 100)
14:00 EUR German Car Registration (MoM, YoY) (May) (EUR/USD, DAX)
15:00 JPY Leading Index, Coincident Indicator (Apr) (USD/JPY, Nikkei 225)
18:00 CHF ZEW Expectations (Jun) (USD/CHF, SMI)
19:00 GBP 15-Year Treasury Gilt Auction (GBP/USD, FTSE 100)
21:00 USD MBA Mortgage Applications, Refinance Index, Purchase Index, Market Index, 30-Year Mortgage Rate (USD, S&P 500, Nasdaq 100, Dow Jones)
22:30 USD Building Permits (May) (USD, S&P 500, Nasdaq 100, Dow Jones, Gold, Crude Oil)
23:00 CHF SNB Quarterly Bulletin (USD/CHF, SMI)
00:00 USD Fed Chair Powell Testifies, New Home Sales (May) (USD, S&P 500, Nasdaq 100, Dow Jones)
00:30 USD Crude Oil Inventories, EIA Stockpiles, Refinery Runs, Gasoline & Heating Oil Data (USD, Crude Oil, S&P 500)
01:00 CAD Budget Balance (Apr) (USD/CAD, TSX)
02:00 USD 5-Year Note Auction (USD, Treasury Market)
From time to time, StoneX Financial Pty Ltd (“we”, “our”) website may contain links to other sites and/or resources provided by third parties. These links and/or resources are provided for your information only and we have no control over the contents of those materials, and in no way endorse their content. Any analysis, opinion, commentary or research-based material on our website is for information and educational purposes only and is not, in any circumstances, intended to be an offer, recommendation or solicitation to buy or sell. You should always seek independent advice as to your suitability to speculate in any related markets and your ability to assume the associated risks, if you are at all unsure. No representation or warranty is made, express or implied, that the materials on our website are complete or accurate. We are not under any obligation to update any such material.
As such, we (and/or our associated companies) will not be responsible or liable for any loss or damage incurred by you or any third party arising out of, or in connection with, any use of the information on our website (other than with regards to any duty or liability that we are unable to limit or exclude by law or under the applicable regulatory system) and any such liability is hereby expressly disclaimed.