[QUOTE=IronHeart;197134]I’ve made some diagrams that explain my plan a little better. I pre-emptively apologise to Tymen if I’m steering discussions off course.
Over the past few weeks, I have followed both Tymen’s rules and Graviton’s wisdom to carry out multi-timeframe analysis and make entries based on Tymen’s CBL method.
From my experiences so far, it has been very difficult to ride a trend out properly and make large pips due to the short term price fluctuations that occur before price decides to make a determined move up or down.
A large percentage of the time, my analysis is correct - BUT, even if I make a good CBL entry, I have no guarantee about future price action.
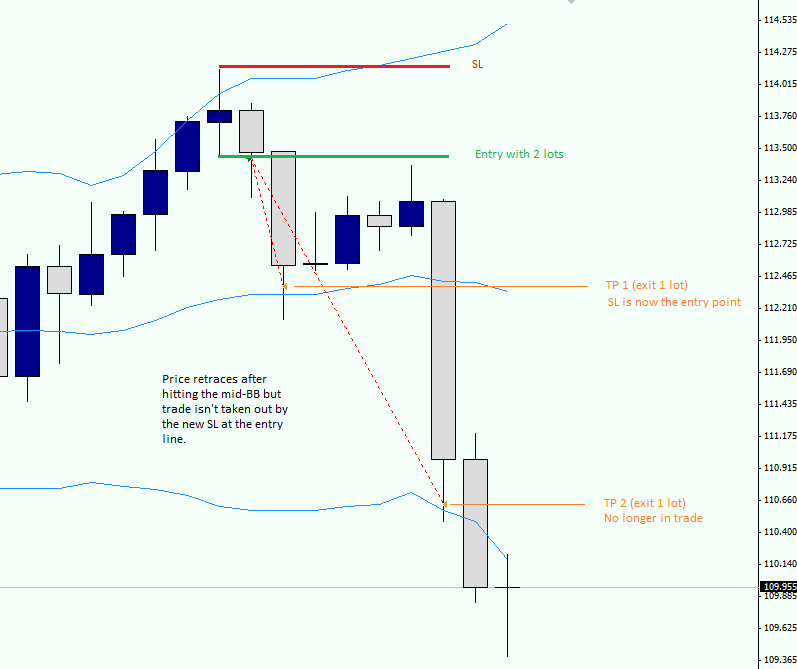
The largest issue thus far has been the middle Bollinger Band - a large percentage of the time, price will hit the mid-line and retrace. If my entry is too close to the mid-BB, my 2-lot strategy makes only TP1 before my SL at the entry line is hit.
On these trades, the multi-lot technique works better, since its SL isn’t moved until PA is a reasonable distance away from the mid-BB.
On the flip-side, if my entry is a far distance away from the mid-BB, the retrace often takes out the multi-lot strategy, whereas the 2-lot strategy performs better, since its SL is further away.
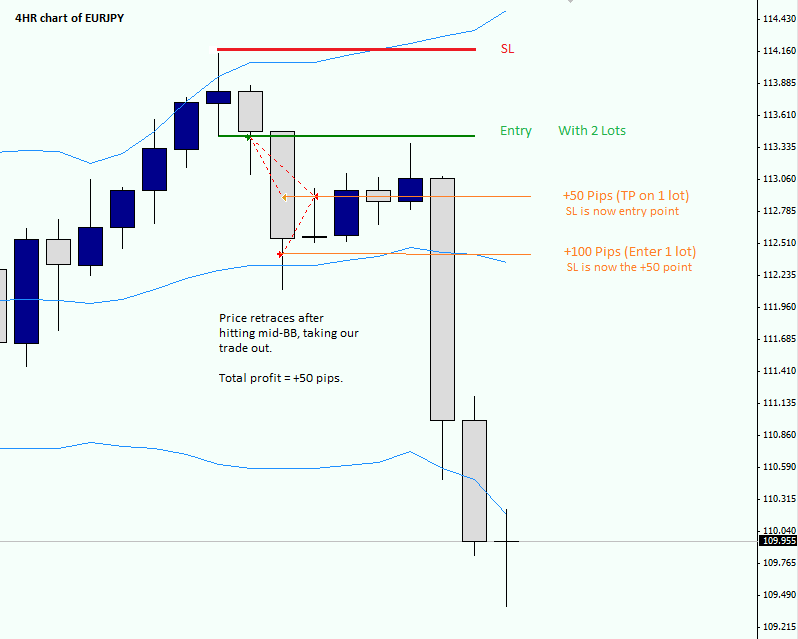
Here is a trade on the EURJPY 4H using Tymen’s multiple-lot entry strategy, which uses 2 lots to enter and exits 1 lot at the first milestone, which I have selected as +50 pips. Pyramiding begins at +100 pips, which is where another lot is added and the SL is adjusted accordingly to only risk 50 pips.
Notice on the above chart that after price reaches +100 (at which point the SL is changed to the +50 point), a retrace occurs and takes the trade out.
In this case, the total profit is +50 pips.
It’s unfortunate that we are no longer in this trade, which carries on going in our desired direction.
Now notice the same trade with the 2-lot strategy.
IronHeart,
This looks like a reverse trend trade which a bounce off the MidLine is the norm. I do not use a stoploss this tight and normally don’t use one at all. I would sell at any retrace across the MidLine and enter the trade again if I was confident of the move down. The price of the commission is better then a stoploss.
I’m new to this thread and do not know exactly how you’re determining the trade other then the Bols but the question that comes to mind is did you know where the trade was going before you actually made the trade? I do not know your trading experience but to many newbies this sounds impossible. To an experienced trader this is basic before making the trade.
There are many factors that can create this bounce off the middle and one being the fact many traders sell as I do on the retrace in a counter trend trade. I do not suggest counter trend trades unless you are confident of the PA moving through the middle line. Having only your chart to make a decision I would agree this was a good trade but still not enough to tell me how far it was going down. A lot of moves take two times to complete the move as this one did in your example.
With the two contracts you might calculate the profit by selling both on the retrace and re-entering on the downward move. I also suggest that moving your stoploss as you did is not a wise decision on this type of trade as the outcome is quite normal. A better move would have been to set the stoploss at the middle line after the PA crossed the line and re-enter at the reverse cross or sooner. Just an idea.
Happy trading,
Johnny


