A journal of using a Forex back testing application

Introduction

I have been asked to review a backtesting application and provide honest feedback. I have chosen to write a journal of sorts in the Trading Tech & Tools section of the babypips forum to record my journey through the testing of this product.

On a personal basis this is a timely opportunity to progress my own 2021 Forex trading plan, late that it is.

However, for the purpose of this test, I shall be using some indicators which I hope almost everyone will be familiar with. I will be aiming to provide weekly updates of progress in the testing of this product, and will try my best to report what I have tested, why I have tested it, and the outcomes of my experience with it. Basically, does it do what it says on the tin?

I will be mindful that the audience may range from complete novice to experienced trader with a lot of automated testing experience. If you are one of the latter, please go easy on me, but please do give me the benefit of your experience and ask questions. The review is aimed at those who have not yet tried to back test their plans (or those who don’t even know why back testing is an integral part of a trading plan).

Disclosure
This will be the first time I have spent more than a few hours trying to use a software designed for automated back testing. I have tried (and failed) to use MT4 about a decade ago. I had planned to create a test strategy and plan in TradingView, but have failed to progress that in the last three months.

During the next 12 weeks, it is my intention to document my journey in some detail, using as simplified version as possible of an actual test strategy and plan. I will define the objectives of the tests and try to make them as broadly applicable as I can. However it will be limited to the foreign exchange (Forex) market.

I encourage discussion from any member who has an interest in learning along with me what can be gained from using an application designed to back test a plan, to be able to do that over and over again monitoring the impact of changes to plan parameters, settings or “indicators”. I will start off with one simple objective. TO LEARN HOW NOT TO LOSE MONEY. If I achieve that objective, I hope to have helped 90% or more of those who follow this Topic.

The outcome I have decided I want to achieve is a selfish one. It is to confirm that the time spent testing the application, and in writing this journal as a formal record of the testing, will pay back many fold as I continue with my plans for continuous improvement in Forex strategy and plan development.

Now, let’s make the first journal entry. To be continued…

15 Likes

This is a journal of testing the Backtesting application known as Forex Tester 5.

If you have never seen a trading screen before, a typical screen consists of a chart area and many option boxes, icons or buttons that control what is shown in the chart area. Each chart package provider has different layouts but they are very similar to each other. Throughout these tests, I will be using the Forex Tester 5 software. A free download is available with limited test parameters at the link provided below.

Click the “Free Trial Download” icon near the top of the screen in the link above.

This is the first of a series of 12 weekly tests. In this first post, I am only commenting on the Quick Start Guide.

Forex Tester 5 - Quick Start Guide review

1 Basic Testing Actions (3 minutes)

Near the top of the screen, note Start, Resume, Restart, Speed of testing, Timeframe
Click “Start” A backtest simulation starts

/Pause / Resume
2

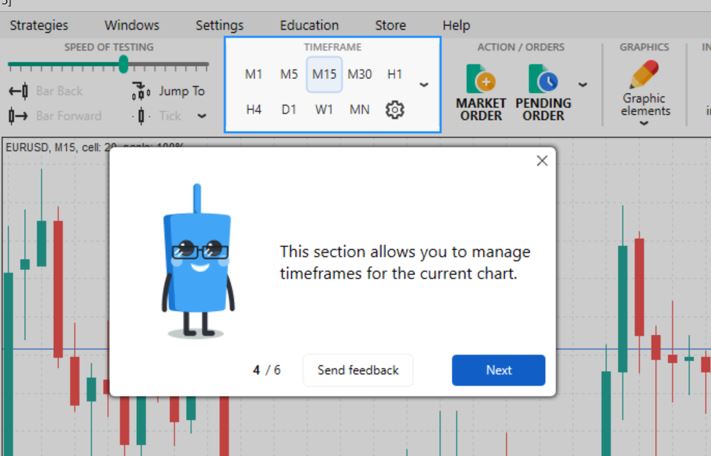
Timeframe section - timeframes from one minute (M1) to one month (MN)
Next, choose one of the timeframes (eg M5)

Speed of Testing. A slide bar to control the speed of the test

5

2 Market Order (3 minutes)

Near top of screen, Action / Orders - Market Order
A simulation test starts.

Click “Market Order”
6

A list of currency pairs opens. Choose a pair symbol.

Lot size. Choose a lot size (eg 0.1)
You are going to: Buy (go long) or Sell (go short)
Choose the “Buy” buttton

The bid / ask price appears near the foot of the box.

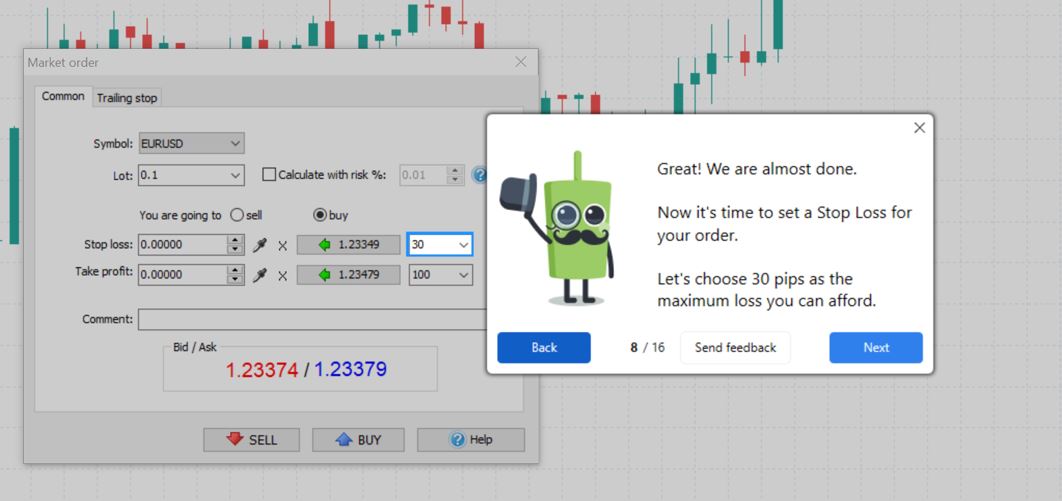
Set Stop Loss - choose the number of pips (30). Click the green arrow button to the left of the SL pips box, and Forex Tester 5 will display the stop loss price automatically.

(Optional) Set a Take Profit level in pips (eg 100). Click the green arrow button to the left of the TP pips box, and Forex Tester 5 will display the take profit price automatically.

Click “Buy” to place a market order (long)

At the foot of the screen you will see Ticket #1 - Open order. Buy 0.1 lot, date/time, open price 1.23379, SL 1.23349, TP 1.23479, market price 1.23374, swap 0, commission 0, points -5, profit -0.5.

The chart will show dashed lines as red (stop loss) blue (take profit) and a text box (Buy) with the price on the right scale in black background.

You can right click on an open order to perform actions (close, modify, create copy, close part position, close all position). Alternatively, click the Order tab at the top of the screen (next to the Home tab) and choose “close order” icon.

At the bottom of the screen click the “Account History” tab. The closed trade will appear as ticket #1 with a loss of -0.50. Deposit balance (in this demo account) 10,000, profit from closed trade -0.50, profit / loss -0.50 (-5 points), balance 9999.50

3 Add Indicator (5 minutes)

Click “Home”, See “List of Indicators” icon.

A drop down list of indicators appears. Choosing an indicator.
Choose “Trend” then subcategory “Moving Average”.

Parameters tab. A list of parameters appears in a new box. In this example the chosen parameters are: Period (5), Hshift (0), Vshift (0), MA type (simple, or SMA), apply to price (Close),
Then: Style (blue solid line).

Timeframe tab.

Choose from the shortest (1 min) to the longest (1 month). Note that a moving average line appears on the chart.

Add an Oscillator (MACD). Click “List of Indicators” and choose category “Oscillators”, choose subcategory “MACD”.

A list of parameters appears in a new box.

Note: Common. Fast EMA period (5), Slow EMA period (13), SMA period (3), Apply to price (Close)
Styles MACD (silver - solid line). Signal line (red - dotted line).

Click “Apply”. The MACD oscillator appears below the main chart with its chart title "MACD, 5, 13, 3, close.

4 Run a Strategy (4 minutes)

12

A EURUSD test simulation starts. Many traders use Robots (or Expert Advisors, or EAs) in their trading. EAs are programs developed to follow some trading strategy and execute the trades automatically due to a pre-set algorithm.

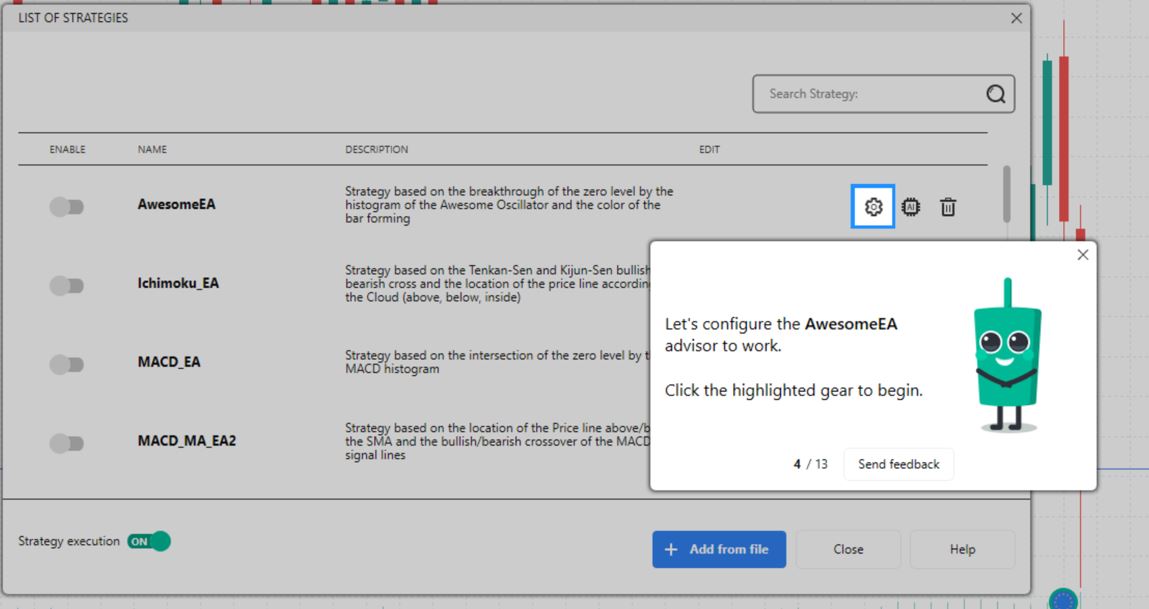
At the top of the screen click the “Strategies” tab. Turn the “Strategy Execution” switch to “ON”. Forex Tester 5 has some built-in strategies. Click “List of Strategies” and choose “Awesome EA” advisor setting button (the cog wheel).

14

A parameters tab opens.

Symbol and timeframe. Double click the symbol line and chose EURUSD. Double click “Timeframe” line and choose “1 hr”. The line parameter changes to “60” meaning 60 minutes.
Leave the other parameters on their default settings - they can be changed later in a real strategy run.

The strategy is now enabled. The simulation shows buy/sell signals on the main chart. Next step is to check how the EA works in practice.

Click “Home” tab. Click “restart” to apply the strategy. Click on the “Account History” tab at the foot of the screen. As the EA opens and closes trades, according to its rules, the trades will be added to the Account History. Let the simulation run for a while. It stops at 19 trades showing a remaining balance of 9985.39.

5 Data Centre. (4 minutes)

Downloading / uploading historical data for your projects. Using the historical data feed for the backtesting process.

Create a first project instead of using default strategies.

Download enough historical data.
This opens a “DATA CENTER” icon. Open a Data Center Window. A drop down menu appears with lists of Majors (7), Crosses (9), Crypto (BTCUSD), Exotics, Futures, Indexes, Metals, Stocks (Canada), Stocks (EU), Stocks (UK) and Stocks (US).

Select at least 2 currency pairs from the list.
Click the “update from server” box.
Select “download part of history”
Select “to” and “from” date range (leave these as selected in the simulation)
Click “update” to continue
Click the Exit button.

The historical data is ready to be used for a new project.

6 New Project (4 minutes)

New tutorial launches.
Projects in Forex Tester 5 are like files where information is kept about every testing session.
Create a new project. Click the “Home” tab at the top of page.
Click the +New Project icon. Set Project name (eg EURUSDTEST18OCT21).
Select symbols (eg EURUSD, GBPUSD)
In tutorial, time period is set from 2018:04:01 to 2018:04:30. In testing quality, click “use 1 minute data”, click Next. Click “Create”.
Testing starts right after the project is created.

Summary and Comments

I read through the Quick Start Guide three times. The first time I skim-read the content. The second time I took notes about which sections of the software product each quick guide step covered. The third time I took some print screen / snippets of screens to make the text of my testing more relevant for the reader.

In summary, I think the quick guide is a good balance between speed and detail. I look forward to the next set of tests.

I’m happy to answer any questions on this application test thread.

6 Likes

Dumb question. You need historical data right? Is that included inside, or do you… have to bring your data in like a spreadsheet or something? I read section 5. Does download mean, you download it from the app?

1 Like

Hi, there is no such thing as a dumb question. If I get this answer wrong, I will correct it in due course. It is my current understanding that the data imports are provided by the application owner. I know there are limits on the free version. I will be doing some real testing soon, so will be able to qualify that answer including their source of that data.

Thanks for the question.

4 Likes

This is a short post to the thread. It is the first five lessons in the Basic Course offered in the Forex Tester 5 application. The entire basic course intends to make use of the Forex Tester application to explain its relationship with the Forex education market in general, so that the trainer can become familiar with navigation of the screens as they learn about the Forex market.

Go to the link to the free download:

Start the lessons here:

Click the “Start Basic Courses” button in the screenshot below.

Forex Tester 5 – Basic Course – Lessons

image

image

Lesson 1 is denoted as L1 notes, Lesson 2 as L2 notes, etc.

L1 notes

Forex market and the use of Forex Tester 5 software during the 32 lessons. Use of the speed slider and the Pause button on the Forex Tester chart.

L2 notes

There are 10 million Forex traders around the world. (Editor – this amounts to 0.14% of the world’s population, or 1 in 700 people. No wonder Babypips members find it difficult to find anyone with the same interest in Forex in their neighbourhood).

L3 notes

Pairs are defined as three groups – the Majors, Crosses and Exotics

L4 notes

80% of the total value of Forex trades is contained within the major pairs.

There are seven major currencies – all paired with the USD. They are EUR, GBP, JPY, CHF, CAD, AUD, NZD. A total of 7 pairs.

The EURUSD pair is responsible for 24% of total Forex turnover.

They all have nicknames based on historical use.

Finding pairs in Forex Tester 5 – Data>Data Center>Major, Crosses, Exotics lists in drop down box.

Check historical data available from the application owner’s server, or you can import your own datasets from a file.

L5 notes

Crosses are pairs that do NOT include the USD in the pair.

An example of a cross pair is AUD/CHF = AUD/USD+USD/CHF.

Mostly are based on EUR, JPY, GBP. There are a total of 20 crosses.

Crosses are (in the main) more volatile than the majors.

Note that a pop up box appears during study of the lessons. It asks for feedback and asks for your email address, presumably to identify prospective customers for sale of the paid version of the software.

Click on DATA CENTER icon, a major pair, crosses pairs box opens. Crosses available in the demo version are shown. Click the + symbol to expand the crosses. A list of crosses available in the paid data subscription version is shown.

3 Likes

Is there a app for this

Yes, go to forextester.com/ft5 as in the picture below and click on “Free Trial” red symbol.

2 Likes

Is this some kind of variation on MetaTrader? UI seem to borrow many elements from MT. Wondering if this is a standalone or some kind of MT mod distro. Cheers!

Hi,
Do you mean MT4 or MT5 or another? It’s years since I fired up a MT4 or 5 screen, so I would have forgotten what they look like.

MT4 (not sure how MT5 looks like as I only used MT4)
It looks very similar and some elements such as fonts, label positioning, even whole activity section looks like quote from MT4, so asking just from curiosity.


Hi @wilczasty,
Thank you for this feedback. In my second post on 18Oct21 I said " Each chart package provider has different layouts but they are very similar to each other". I have added an image below from TradingView, with same pair, daily, and a MACD chart below the main chart. As you may see, this also looks very similar to the MT4 chart layout. I can only assume that as one provider changes their layout and customers approve, then the rest follow. I can compare this with some recent education I have done for myself with different operating systems on computers. I note that over the last decade MacOS, Win10, Raspbian and Ubuntu all seem to get more and more similar in their layout. As you move from one to the other, when the differences get less and less, the customer becomes more and more comfortable and even forgets which operating system he is using. Even looking at Libra Office and MS 365 office suite, there are hardly any differences in screen layout any more.

3 Likes

The next set of notes on the Forex Tester 5 (FT5) lessons.

L6 notes

Exotics are pairs consisting of one major currency and one from a smaller or emerging economy. They are MXN, TRY, NOK, DKK, SEK, SGD, HKD, THB, ZAR, INR. Exotic doesn’t necessarily equate to a small economy.

Exotics are typically more volatile and less liquid than majors or crosses, and generally have higher bid/ask spreads.

The Forex Tester 5 simulator (FT5) has a wide range of exotics to test. Data for exotics is only available in the paid version of the software.

L7 Base and quote currencies.

Base is the first currency of the pair and quote is the second currency. For example, in the AUDUSD pair, the AUD is the base and the USD is the quote. The numbers on the right axis of the chart show how many quote currency you get for one base. Eg. If the EURUSD chart shows the buy price is 1.231294, that means you get 1.23194 USD for 1.00000 EUR.

L8 Going long or short.

The lesson shows an example of choosing a pair to trade. To buy (or go long) means the trader expects the base currency to go up (get stronger) or the quote currency to go down (get weaker) or both. To sell (or go short) means the trader expects the base currency to go down (get weaker) or the quote currency to go up (get stronger) or both.

L9 Bid / ask price

Bid price = broker accepts a sell order

Ask price = broker accepts a buy order

Bid = demand, Ask = supply

Bid – Ask = Spread

By default, FT5 shows Bid price on the chart right hand axis. Ask level line can be added in chart settings. Now both ask (higher) and bid (lower) lines display on the chart.

The higher price is the one you pay to buy. The lower price is the one you receive when you sell.

Bid (sell) price is shown in RED text, Ask (buy) price is shown on BLUE text.

The lesson 9 module steps the trainer through a simulated live sell order entry and exit with no stop loss or take profit levels set up, and shows the account history when the trade is exited. Note that the broker has closed the trade at the higher (ask) price because to close a trade the trader must “buy” the contract he opened as a “sell” order.

L10 What is spread?

It is a broker fee built into the bid/ask price quoted. “No commission” means “my broker costs are included in the bid/ask spread. Spread is displayed right next to the bid/ask prices on the screen

Spread (in PIPS) is shown in column headed S next to Bid and Ask in the snippet below.
image

The spread depends on the currency involved, the trading time and the economic conditions.

Currency pair. Higher volume equates to tighter or narrower spreads.

Trading time. Fewer trades outside of normal trading hours means less liquidity, so spreads are wider than during the most active trading times for that pair. Overlapping London and New York trading hours normally result in the narrowest (or tightest) spreads.

Economic conditions. Extreme volatility can occur due to significant geopolitical events causing wider spreads and even gapping. Spreads can become very wide. The wider spread narrows the risk for the broker if he takes trades on his account during such events. Keep an eye on the economic calendar to avoid surprise changes in spreads.

Fixed spreads.

Are available from market makers, the opposite of non-dealer desks. Pros and cons of fixed spreads vs floating spreads are reviewed. Example of calculating spread cost in a live trade by opening and immediately closing a EURUSD trade. Cost was 2.7 pips or $16.20. How is it calculated?

The total cost is the cost per PIP x number of lots x $ cost per lot. 2.7 (spread in PIPs) x 6 mini-lots (10,000 units) x $1 per cost of a mini-lot) = 2.7 x 6 x $1 = $16.20.

3 Likes

Preamble.

Now I am getting into this series of lessons, it occurred to me that this is a good introduction to charting in general for a newcomer to Forex who has not navigated one or more of the broker charting packages. It takes the trainee through simulated events to learn slowly which tabs, icons, buttons or drop down menus to use for each of the most basic (and some of the advanced) functions.

Just over half way through I am enjoying the journey, and it has reminded me of some of the important things about order placement that I have forgotten over the past two years. I’ve been too busy with Crypto exchange platforms to notice the difference.

I have suspended the use of screen snippets in the interests of getting this series of lessons completed early to be able to move on to some practical examples of back testing.
If the content is difficult to follow, please do comment and I will fill in any blanks for the benefit of those following this thread.

L11 What is a PIP?

One PIP is the fourth decimal point of 0.00000 equal to one / 10,000 of the exchange rate. JPY is an exception to this – it is the second decimal place, because there are around 100 JPY to one USD. So the second decimal place is still one ten-thousandth of the exchange rate (0.01 is 100/10,000). The fifth decimal place is called a pipette or more commonly referred to as a “point” by Forex traders. One point is 1/10 of a PIP.

L12 What is rollover?

Rollover is the automatic renewal of an open trade at 5pm EST, 10pm London time or UTC (Coordinated Universal Time). UTC succeeded GMT (Greenwich Mean Time).

L13 What is the PIP’s worth?

FT5 only uses USD as the currency of account denomination.

Lot sizes definitions

  • Lot Size Currency Amount / PIP

  • Standard (100,000) $10.00

  • Mini (10,000) $1.00

  • Micro (1,000) $0.10

FT5 simulates selling two EURUSD orders (a 0.1 lot and a 1.0 lot). The Open Position window at the foot of the screen shows the “points” value (tenths of a PIP) is the same for both trades whilst the profit values differ by an order of magnitude (one is ten times the size of the other).

L14 What is a LOT in Forex?

A LOT is the currency unit quantity required for a trade. Lot sizes are tabulated in L13 above. For each pair, the standard LOT is denominated in the base currency (the one at the start) so:

  • One lot of EURUSD = €100,000

  • One lot of USDCAD = $100,000,. and

  • One lot of GBPUSD = ÂŁ100,000

In FT5, the lot size appears in, and can be adjusted from, the Symbol properties. Eg. Open “Data” tab > Data Center > Click Symbol (EURUSD) box. Open “change properties” box. The default lot size is 100,000 (a standard lot). Change default size (eg to 10,000), close the Data Center window and click the Exit button.

The lot size represents the amount of risk you are assigning to each trade. (in currency). As price changes are measured in PIPs, their monetary value for each lot size of a particular currency will differ.

If you are a new trader, always start in a demonstration (demo) account using the micro lot. When you make a mistake (and you will make mistakes), their impact will be minimal. This is a good preparation strategy for real world trading.

L15 What is an order?

Orders can be placed over the telephone, though it is rare these days for a retail trader (you and I). It is far more common today for retail traders to place orders with a broker via an online application or “trading platform” that your broker account is set up to use.

Market order – is settled in real time

Pending order – waits for a matching order to become available in the market

L16 What is a market order?

An order from a trader to a broker to buy or sell an asset at the price the broker has provided. Trader buys at asking price and sells at bid price. See L9 for details of bid / ask price and spread.

FT5 simulates a market order.

Go to Home > Market Order >. The market order window opens.

Simulation chooses symbol EURUSD and lot size 0.1 lot. On the chart, at the time of order, a “buy” text box appears with a buy price of 1.23297 shown on the right hand chart axis.

At the foot of the page, ticket #1 shows a EURUSD Buy order for 0.1 lot at 2018.04.02 10:04 hours, Open Price 1.23301, SL 0, TP 0, Market Price 1.23297, swap 0, commission 0, points -4, profit -0.40.

Click “Order” > Close Order.

L17 What is a pending order?

A pending order is one that is created to be executed at a later time at a price you have indicated. The advantage of a pending order over a market order is to protect a trader against significant losses.

If the indicated price is never reached, the order is never fulfilled. There is no order risk (and no reward either) for the trader.

FT5 shows a table of pros and cons of market orders vs pending orders.

There are four types of pending order:

  • Buy limit,

  • Sell limit,

  • Buy stop,

  • Sell stop

L18 Buy Limit and Sell Limit Orders

Limit order – to buy or sell a trading asset at a specified price or better.

  • Buy Limit Order. The ask price must be lower than the current market price.

  • Sell Limit Order. The bid price must be higher than the current market price.

Limit orders are good solutions for thinly traded, or highly volatile assets, or those that have a wide bid/ask spread.

FT5 simulates placing a buy limit order.

Click “pending order”, and choose “symbol”, then “type”. Click the pipette icon (At Price). A dashed red line appears on the chart (GBPUSD, H1). Drag the line to the desired buy limit level (eg 1.42941) just below the open of the previous candle. Note the box (buy limit (-101) on the chart. The buy limit level is 101 PIPS below the current market price.

Click “place order”. Click “pending orders” tab at the foot of the screen. All pending orders are listed. FT5 simulates a buy limit order that is fulfilled. The pending order has moved from Pending Order tab to Open Position tab when the price hit the “buy limit” value of your pending order.

L19 Buy Stop and Sell Stop orders.

A buy stop order is an instruction to buy an asset once the market reaches your minimum specified price or higher. The buy price specified needs to be higher than the current market price. You place a buy stop order when you expect the price to reach a certain level, then to keep rising.

A sell stop order is similarly described in this lesson.

The FT5 simulates a sell stop order.

Choose “pending order” icon. Select the Type drop down menu and choose “Sell Stop” order type.

Click the pipette at the “At Price” box. A dashed red line appears on the chart.

The price should be LOWER than the current price for the sell stop order. Eg. Drag the line to 1.42818 just below the low of the candles 6 and 8 hours ago. Note the line appears as “execute price” at 1.42810.

Click “place order”. The dashed line colour changes from red to green and the order appears in the Pending Order tab at the foot of the chart.

Click the “Resume” icon. FT5 continues the simulation until the price reaches the Sell Stop price. The Pending Order entry moves to the Open Positions tab.

The Pending Order has been turned into a market order at the Sell Stop price. Click “close order” to end the simulation.

L20 What is Stop Loss?

If a market or a pending order is fulfilled, any stop loss that has been specified in the order setup is attached to the open position automatically by the broker. For long (buy) position, the stop loss is always set below the current Ask price. For short (sell) positions, the stop loss is always set above the current Bid price.

FT5 simulates adding a stop loss (SL) to a market order.

Note: Don’t type anything into the Stop Loss box (9 of 21).

Click “Sell” at next tutorial prompt. FT5 reports: “The current bid price is 1.40313” Change the stop loss from 30 pips (default setting) to 100 pips in the drop down menu. Click “Next”. The click the green button to the left of the 100 pips box that has been greyed out. The SL value is calculated by the simulator to be 1.40413 – or 100 pips higher than the current price.

Click the Sell button. The chart shows a dashed red line at 1.40413 (stop loss) and a dashed green line at 1.40313 (the market order price).

The order appears as a line entry (ticket #1) in the Open Positions tab at the foot of the screen.

The position remains open until it is liquidated (reaches the stop loss value) or until you cancel the order.

4 Likes

Preamble.

These are the notes on the last twelve lessons in the Forex Tester 5 back testing application.

I have found the lessons a good summary of what is important with respect to using a charting package. In particular, the sections on Symbol Properties inclusion of commission, spread, rollover and other fees that may be missing from other demonstration account packages will deliver a fully representative back testing package that is as realistic as a real world test.

I now look forward to testing some real plan scenarios in later posts.

L21 What is a swap in Forex?

A swap is a broker fee that is added or deducted from a trader account balance, also known as rollover, interest charge, cost of carry, carrying charge, premium, overnight funding, charge or financing charge. A swap is a fee, paid or charged after rollover. It is to keep the trade open overnight, and it is not applied evenly for each day of the week. FT5 shows a simulation in support of understanding this swap. It is impacted by the interest rates applied interbank for both currencies in the pair. If the purchased currency interest rate is higher than the sold currency interest rate, the swap is positive. If the purchased currency interest rate is lower than the sold currency interest rate the swap is negative.

A buy order open overnight has a long swap.

A sell order open overnight has a short swap.

FT5 simulates a swap charge and how to set swap fees in the software for swap long points and swap short points. Data > Data Center > Symbol GBPUSD > Commission tab > Swap long points, swap short points. In the “swap long” points box enter “-0.81” and in the “swap short” points box enter “+4.4. Click OK and click Exit.

FT5 simulates a market order for GBPUSD pair. Choose lot = 1.0, from Lot drop down menu, and click “BUY”.

Order is placed 04/04/2018 (Wednesday) at 11:00 GMT. Rollover will happen at 00:00 GMT on Thursday. Resume testing and watch the chart time. Swap = -24.30 at 00:00 Thurday 05/04/2018 (the swap charge is 3 times the -8.10 long swap cost), being a Wednesday trade.

At 00:00 hrs on Friday 06/04/2018, the swap charge is now -32.40 (another daily -8.1 charge is added to the existing -24.30 Wednesday charge.

You can make money trading from the positive side of the rollover interest charge, and this is referred to as a “carry trade”.

Holiday swaps are charged when banks are closed. These swaps will be charged two days before the holidays.

L22 What is a commission in Forex?

Commission is a transaction fee charged by a broker to a trader. It is charged on every trade placed.

Fixed – defined as $X per Standard Lot

Variable – defined as $X per $million units traded.

Generally the bigger the volume, the higher the commission. You still have to pay the spread fee even if “zero spread” is quoted by the broker.

FT5 simulates how to set up brokers commission so that the net profit is calculated correctly. If you trade low volumes, the better option is to trade “fixed commission per standard lot”. Click Data Center button. Choose USDJPY, change properties, commission per lot. Suppose the broker commission is $350 per 100K traded. Choose “per side”, or “round turn” as per the broker contract conditions. Choose “apply” when opening the position.

Set “commission per lot” to +$7.00. Click OK and Exit to close Data Center. Click “Home”, “Restart”.

FT5 simulates opening a short trade with those costs set as default within Symbol Properties.

Open “Market Order”window and choose USDJPY.

Choose lot: = 0.3 (3 mini lots), choose “SELL” to place your order. At the foot of the page the commission column shows -2.10. Calculating the commission cost – Commission Rate (per standard lot) = $7.00 per turn. Contract size (3 mini lots) = 0.3 Standard Lots. Commission = cost per lot x number of lots = $7.00 x 0.30 = $2.10

Which option to choose from a broker (commission cost + tight spreads, or no commission and wider spreads) depends on the trader trading profile. A long term trader may opt for floating spreads and no commission.

L23 What is leverage?

Trading with leverage is also known as (aka) “margin trading” or “trading on margin”. You use funds lent to you by your broker to trade positions significantly larger than the real amount of money you have in your trading account.

Expressed as X : 1, and represents the amount of money available for your trade divided by the actual amount of money in your account.

At the extreme (500 : 1) with a $1,000 deposit your trades can control up to $500,000 value, though recent changes to legislation in most jurisdictions that offer legal protection to the trader it is more likely the broker offers are more like 20 : 1 to 50 : 1 maximum leverage offered. Leverage settings can be adjusted in the Symbol Properties window.

FT5 simulates how to change the default leverage setting. Data > Data Center > EURUSD > Change Properties, Common tab, Leverage x 1 . Default is 1 x 100 but trader can change this setting. Do not change default in this lesson.

Click OK then Exit to close Data Center window.

Click Home > Restart > Yes to apply the changes to any Symbol Properties

If you open one standard lot ($10 / PIP) with a 1 x 100 leverage and the market moves in your favour by 1 pip, you have increased your investment value by $10 x 100 leverage = $1,000.

But if the market moves 1 pip against you, your investment has decreased by $1,000 and you have lost all your money. Do not blow your account out by misunderstanding leverage. Practice on this demo account instead.

FT5 simulates a new market order using leverage to place a 5 lot order on EURUSD. Click BUY to open the order. The order is opened. Note the open position at the foot of the page shows:

Ticket #1, balance 10,000, Equity 9975.00, margin 6143.85, free margin 3831.15, margin level 162.36%, points -5, profit -25.

Sensitivity of the trade is $5 per point, or $50 per pip. If the price moves against you by 100 pips, you lose 100 leverage x $50 = $5,000.

L24 What is margin?

Margin is a relatively small amount of funds required as collateral to open and maintain a new trading position. It is “the amount of money you need to enter a trade”.

Margin Requirement

In the broker agreement (a contract), it is usually shown as a % of the full amount of the maximum position allowed. For example, 0.25% for a 400 : 1 leverage account, or 10% for a 10 : 1 leverage account.

Margin is the inverse of the leverage ratio. 1/Leverage Ratio = Margin Requirement (%)

Required margin is calculated according to the Base Currency of the pair traded.

FT5 simulates a market order.

Choose Market Order button., Symbol USDJPY, lot 1 standard and click BUY.

Once opened the specified amount of Required Margin becomes “Used Margin”. See Open Position tab at the foot of the screen. Margin 1000.00, free margin 8996.23, margin level 999.62%.

Base currency of pair is the same as the account currency, so Lot size x Margin Requirement = Required Margin. $100,000 x 1% = $1,000.

Leverage = 1 : 100 (Symbol Properties Leverage 1 x 100).

FT5 simulates a market order (SELL EURUSD) to add to the already open USDJPY trade.

Choose symbol EURUSD. Leave Lot =1 as default lot size. Click SELL.

Base currency is EUR. Lot size x Margin Requirement x Exchange Rate of Base currency to account currency = $100,000 x 1% x 1.23093 = $1,230.93. The total margin is now $2,230.93, being $1,000 on the USDJPY trade and $1,230.93 on the EURUSD trade. Free margin is now $7762.30 and margin level is 447.94%.

L25 What is free margin?

Free margin is the money in your trading account available for trading. The funds not currently being used for open trades.

Equity – Used Margin = Free Margin.

If there are no open trades, then Free Margin = Equity.

FT5 simulates a market order to see how free margin changes during an open trade.

Choose Market Order, Symbol GBPUSD, lot size 5 standard lots, and click BUY.

Margin = 7787.55, free margin = 2777.45 = 138.64%.

Click “Resume” button. Observe free margin to fluctuate with current price of the trade during the simulation. If the trade is in profit free margin increases. If the trade is in loss, free margin reduces and can become zero until all equity is used up.

If you try to place another order, a warning “Insufficient Margin” will appear. If equity goes to zero, the broker will close the trade and your account is blown up (becomes zero value). You will experience a “Margin Call”

L26 What is Margin Level?

Used margin / Equity (expressed as a %)

Equity / Used margin x 100% = Margin Level.

If no open positions Margin Level = 0%

The higher the margin level, the higher is the free margin to open more trades.

Good practice is to always ensure it is above 100%. Add funds or close open positions to maintain this position.

L27 What is a margin call?

There is no standard minimum margin level that initiates a margin call. Check your broker agreement. Typically, it is anything at or below 100%. Action needed – deposit more funds in your account, close open positions, or both until your free margin exceeds 100%. Failing corrective action, your broker will close out your open positions on your behalf to recoup losses.

FT5 reviews actions to prevent a margin call.

FT5 is only a market simulation, so there is no such thing as experiencing a margin call using it.

L28 What is balance?

It is the amount of money in your trading account. Displayed as “balance” in the terminal window in the Open Positions tab at the foot of the screen. It is otherwise called “risk capital” or “cash that you can afford to lose”. It does not reflect any unrealized profit / loss from open trades. It is affected by swap fees from open trades.

L29 What is equity?

Equity = balance + unrealized profit / loss from open trades.

Displayed as equity in the Open Positions tab in the Forex Tester terminal window.

If there are no open positions, equity = balance.

FT5 simulator opens an order. Choose Market Order. In Market Order common window choose USDJPY, 0.1 lot, BUY. Observe the order in Open Positions tab. Choose “Resume testing”. It shows unrealized or “floating” profit / loss for each open trade. This becomes a real balance only when all open trades are closed.

Click “close order”. Click Charts > Profit Chart for equity (green dashed line) and Balance (purple line).

L30 What is a price chart?

A visual representation of an asset’s price movement over a given period of time. It shows how the pair price changes over the time period.

In FT5 you can view any historical asset price up to yesterday’s data.

FT5 reviews symbols and features of the FT5 chart window.

L31 Bar Chart

Explains OHLC (open, high, low, close) features of a bar chart. Explains bullish and bearish charts.

L32 Candlestick Chart

Explains meaning of body, shadows (wings), colours, bullish and bearish, bullish (green or hollow white), bearish (red on solid black), changing chart colours. Explains OHLC features of a candlestick chart.

4 Likes

Hi @wilczasty,

I can now answer your question a bit better. Yesterday I watched a series of videos relating to FT5 and the narrator said that the FT series has been modelled on the layout of MT4 so that users of this (probably) most popular trader interface would already be familiar with the layout of FT5 and so would have a fast learning curve. I was unaware of this until I watched these videos.

4 Likes

Having briefly seen how to navigate Forex Tester 5 in Basic Course Lessons 1 thru 32 earlier in this post, let’s explore the support features available within the software package. You may need to change your screen zoom size in your browser to be able to read some of the text in the snipped images used below.

Support features available in Forex Tester 5.

Education course Educate Yourself with the Forex Tester Course

Already covered in lessons 1 thru 32 earlier in the thread, the course is summarized in five sections of multiple topics for ease of reference as you become more familiar with the features.

Whilst I recommend the Babypips School of Pipsology for a thorough and graduated education in Forex trading
https://www.babypips.com/learn

the Forex Tester 5 education course is summarized to around three hours of effort including navigation of the Forex Tester 5 application specifically for familiarization with its features and benefits for backtesting.

image

Frequently Asked Questions (FAQ) page : All you wanted to know about best trading simulator [Ultimate List]

Tony Bot

On the right-hand side of the home page, you can open a bot – Tony Bot, and ask a generic question from 3 topics as shown in the snippet below.

image

Click on this icon to open Tony Bot

image

The top questions on the FAQ page are:

image

Other FAQ topics are:

image

How To Use (Forex Tester 5) page Ultimate guide on the best materials to get the most of backtesting

Other “How to use” topics are:

image

There are 13 Tutorial videos available that can be watched from within the application window, or directly on Youtube. Links are provided below. Once you have completed the Lessons in the Basic Course earlier in this thread, it should be quite easy to understand the layout of the screens shown in these videos and you should already be familiar with the Forex jargon used throughout.

You may wish to start with Tutorial 13 – registration so that you can follow the tutorials with a live application open on your desktop or laptop if you have not already done so by following the basic course lessons earlier in the thread.

Forex Tester Videos (Tutorials) page How to Make the Most Out of Our Trading Simulator [detailed video]

TUTORIAL VIDEOS

Tutorial 1 – Quick start Forex Tester Quick Start: how to master backtesting - YouTube

Tutorial 2 – Installation Forex Tester installation: easy and quick like 1-2-3 - YouTube

Tutorial 3 – Creating projects Forex Tester: how to open and manage projects easily - YouTube

Tutorial 4 – Start testing Forex Tester: how to start backtesting and benefit from it - YouTube

Tutorial 5 – Placing orders Forex Tester: place orders in a couple of clicks [Step-by-step guide] - YouTube

Tutorial 6 – Modifying orders Forex Tester: modify orders easily [Detailed guide] - YouTube

Tutorial 7 – Using indicators Forex Tester: how indicators can help to trade in profits [Install, test, trade] - YouTube

Tutorial 8 – Using graphic tools Forex Tester: how graphical tools can boost your trading results - YouTube

Tutorial 9 – Using templates Forex Tester: how to trade smarter using templates - YouTube

Tutorial 10 – Using EAs Forex Tester: how expert advisers can automate your Forex training - YouTube

Tutorial 11 – Adjustment of chart displaying Forex trading simulator: how 6 chart modes can help you level up your Forex training - YouTube

Tutorial 12 – Statistics Forex Tester: how statistics leads to better results [the best way to read it] - YouTube

Tutorial 13 – Registration Forex Tester: register the program in a couple of clicks - YouTube

Forex Tester Quickstart Page Start using the best backtesting software in a couple easy steps

This page includes a link to the first video Tutorial 1 – Quick Start.

It also includes a download link to a 194 page .pdf file that contains a written record of most of the content of the Basic Course Lessons and the video Tutorials at:

It also contains a link to a download of the software (free trial version available) at:

https://www.forextester.com/files/ForexTesterSetupEng5.exe

The Demo version contains 1 month of historical data for 18 symbols (16 currency pairs, gold, and silver), as well as 1 month of historical news for USD. You can additionally download 1 month of data for any symbol in the Data Center.

Next topic.

Downloading data from the server and using that data in backtesting some of the built in strategies.

I didn’t realize this was all the same thing. Thanks!

1 Like

Next topic.
Downloading data from the server and using that data in back testing some of the built in strategies.

So moving on to acquiring data for backtesting. I want to perform several back tests using Forex pairs only (majors and crosses). How do I learn how to do that?

Looking at the most recent post to this thread: A journal of using a Forex back testing application - #16 by Mondeoman

I go to the Frequently Asked Questions page:

and look for:

I activated paid subscription but can still only see 18 pairs. How do I download data for other symbols?

The FAQ response answers in detail:

After you subscribe to our paid data service you need to add the necessary symbol(s) in the Data Center window at first.

  1. Open the Data Center window and click the “Add” button in the bottom left to open the Symbols list.
  2. Check the necessary symbol(s) then click the “Apply” button to add them to your symbols list in the Data Center.
  3. All the information of this symbol (e.g.Lot Currency, Base Currency, Margin Currency fields) will be added automatically.
  4. Click “Ok” to save the changes.

When done, please download the data for the symbol by selecting these symbols from the list, selecting the necessary broker and then clicking the “Update from server” button.

In this case I open Data Center window and tick all the major pairs and click the green + Add button.

image

With all the major pairs ticked, click Apply as below.

image

Then click the Update from server button.
Choosing the date range. For the first series of tests we will use the last three years of data, and will not download the tick data.
Click the “Download part of history” radio button and choose “from: calendar date” of 01 October 2018, choose “to: calendar date” of 26 October 2021, select Download only 1-minute history and click “Update” as per screen shot below.

image

The download starts.

image

The entire process of downloading and updating bars took 1 minute and 50 seconds for 3 years of 1 minute data download for all majors. That is on a Virgin Media fibre connection with fast download (~ 350Mbps).

Click Exit.

Repeat the same process for the Crosses for the same three-year period. Click Exit.

WHERE IS THE DOWNLOADED DATA?

Let’s make sure we still have some hard disk space left on our test machine.

The FT5 program downloads by default to the root directory, in this case the C:\ drive of a MS Surface Pro4 tablet running on a Windows 10 operating system. This PC is now nearly 7 years old but is perfectly adequate for the backtesting tasks using FT5.

At this stage (I have downloaded all major and cross pairs for 3 years) the entire ForexTester5 folder is 1.49 GB (gigabytes). I guess these days that is a small sized folder compared with a lot of bloatware around in the Win10 world today.

image

image

Of this 1.49 GB, the data folder contains 1.25GB of data of which the history folder contains 783MB and the rest of the files are in other folders which are INPUT, NEWS, TESTING (467MB).

image

image

Summary comments on file size of downloads.

This is one minute data from which all candles in backtesting are reconstructed by the program during testing.

For the tests intended for this FT5 review, we will not be going anywhere near the minute timeframe. All backtesting will be conducted for analysis of plans based on the daily timeframe (D1).

INITIAL BACKTEST

The initial test. The objective is to run a test as soon as possible just to experience the test interface. We will address further details in subsequent posts. For now let’s get on with it.

How do we do that?

From my previous post, go to the HowToUse page at this link: Ultimate guide on the best materials to get the most of backtesting

NEW PROJECT

Watch the video titled New Project (4 min 25 sec) at this link: https://www.youtube.com/watch?v=DmsND3Bm1Pk&t=10s

If you are doing this live in FT5 whilst following these instructions, do the following:

We will be backtesting the EURUSD pair only. Click New project and save it as (for example) 26Oct21EURUSDTEST1

Use default initial deposit of 10,000, choose start and end dates as 1Oct18 and 26Oct21. Choose OHLC with ticks (note that ticks are simulated randomly since I only downloaded one minute data), check GMT+ timezone (I have used GMT+0 since I am in the UK), click Create.

Save the project. You can save with same name as initial file or with different name if you wish to save different versions of the test as you change settings. This will be reviewed in subsequent tests.

Identify the buttons for Project, Open Project (to see a list of existing projects), and Start, Restart Project – where if you restart without saving with a new file name, all previous test results will be deleted.

START TESTING

A note on STRATEGY and PLAN for any test in this thread.

It is not enough to know how to back test historical Forex data without the test having a specific purpose. This is often overlooked as part of an overall Forex Trading strategy and plan. The procedure mentioned below is borrowed from best practice for testing IT (networks, infrastructure, software applications, operating system updates during development or prior to a new version release). In this series of tests, the intention is to ensure that the series of tests (the back tests) all have a reason to exist, and that they are in a sequence that makes sense to the end use tester (the owner of the strategy and plan).

TEST STRATEGY

A strategy* should only ask What and Why? Once these are properly stated, the rest of the questions and answers (the subsequent testing tasks) are to be included in a Test Plan that can be completed to prove or disprove an expected outcome. A fully detailed test plan will test all expected outcomes of the strategy. In other words, has the “What” been thoroughly tested, and did the test results satisfy all the requirements of the test – the Why(s)?

*Note my use of Strategy to define “what” and “why” differs from the generally accepted Forex trading norm of a strategy meaning what I refer to as “Strategy and Plan”. I apologize for needing to stick to this project-specific terminology that results from working as a professional IT technical project manager who has been testing IT networks, infrastructure and applications for over 20 years. Forex is no different in my opinion. A test is a test. In the IT industry, it is common to use three environments in which to develop, test and release an application. A development system is maintained separately on which to develop an application, a separate test system on which to test the developed software, and a production system on which to release the finished, tested software product to the end users. You would not wish to release a dev or test version of a robot that builds cars onto the workshop floor without extensive testing. So by comparison, you should not be releasing untested ideas (strategies) on your live account without developing and testing them beforehand to ensure that they have a good probability of delivering a positive edge or outcome over time (to learn how not to lose money). This is the essence of back testing.

Define What?

Run a test in FT5 of the built-in “Strategy” referred to as “Awesome EA”. Use defaults for the test period, timeframe, currency. Do not adjust settings of the Awesome EA.

Define Why?

To observe FT5 chart behaviour during a back test.

To familiarize the user with the mechanics of performing a simplified test in FT5 to ensure that the basics are understood, and the user can move on to more complex test scenarios that better represent real life trading.

TEST PLAN

A test plan delivers the test strategy. It spells out the Who, When, Where and How of the Test Strategy.

Define Who? FT5 tester Mondeoman

Define When? 27Oct21 – estimated duration of the test including write up of results on Babypips forum = 2 hours

Define Where? At home/office location.

Define Prerequisites to perform the test:

Access to a test end user computer – in this case a MS Surface Pro with operating system Windows 10 (current release with security updates to 26Oct21), with at least 10GB of test storage space allocated on the local machine.

Access to a registered version of the Forex Tester 5 (FT5) test software.

Access to EURUSD data – 1 minute data from 01Oct18 to 01Oct21 downloaded from FT5 server.

Default test period – 3 years from 01Oct2018 to 01Oct2021.

Default timeframe – Hourly (H1)

Default currency pair – EURUSD

Default settings (settings options ignored for the purpose of this test.)

Define How?

Go to “HowToUse” page at this link: Ultimate guide on the best materials to get the most of backtesting

Watch the video titled: START TESTING (5 minutes) at this link: How to start backtesting: a simple guide [Video]

It is not a bad idea to watch the entire video, then go to the notes below the video and watch it again whilst following the written instructions below the video.

At the end of the test run, you will end up with a result like the screenshot below.

image

Observations from the screen shot.

Simulated trades that are triggered by the strategy are shown on the chart as Buy and Sell.

On the chart extract below, note this is the EURUSD hourly chart.

Observe on the chart the Sell order on 20Oct21 at 08:00 hrs. Open 1.16313, close 1.16433, points -120, profit -1.20. This corresponds to ticket # 915 in the Account History extract in the table at the foot of the screen.

Observe on the chart the Buy order on 21Oct21 at 01:00 hrs. Open 1.16572, close 1.16485, points -87, profit -0.87. This corresponds to ticket # 918 in the Accounts History extract in the table at the foot of the screen.

Note that the simulation bought or sold a total of 920 tickets during the 3 year data period, with a start balance of 10,000 and an ending balance of 9,813.94. Also note that there has been no account taken in this test of spread, or of swap or rollover charges from the broker. It would seem that the AwesomeEA, with default settings, was not a good candidate as an EA for the EURUSD pair over the test period.

Chart extract

image

Account history extract.

image

Test Statistics Summary box

Note the test statistics in the box extract from the top left side of screen. This test was run between the dates of 1Apr2018 and 23Oct2021.

Days processed = 1,301, months processed = 42.75, total trades = 920, profit trades = 311, loss trades = 609, profit trades consecutive = 5, loss trades consecutive = 11. Trades / day = 0.71, trades / month = 22,. profit trades / month = 7, loss trades / month = 14, max profit trade = 12.14, max loss / trade = 8.82, etc, etc, profit probability 34%, loss probability 66%.

image

Check – Did this test plan satisfy the test strategy Why? (the summarized Requirements of the test)

Let’s recap.

The Why? Of the test strategy stated:

To familiarize the user with the mechanics of performing a simplified test in FT5 to ensure that the basics are understood, and the user can move on to more complex test scenarios that better represent real life trading.

The observations from the screen shot at the end of the test, comparison of two trades on screen and their identification in the Account History log of tickets # 915 and 918 familiarized the user with the mechanics of a simplified test, and the outputs at the end of the test. A review of the Test Statistics Summary box showed conclusive negative results, indicating that although the test requirements have been met, it is perhaps not a good idea to use the Awesome EA alone without further understanding the default settings, and to adjust those settings in a subsequent test to determine if the Awesome EA can be optimized as a valid indicator alone, or in combination with other indicator(s).

This is the first time I have observed a back test result in an Expert Advisor. I am recalling the countless hours and hours I spent in the past doing this manually on charts. This entire simulation took a few minutes, and if run on hourly timeframe only, would have completed in a minute or two. (Edited - reran the test on one hourly candlestick and it took 8 minutes to complete).

Later in the test sequence we shall address varying the settings, including realistic spreads and rollovers in the settings, how to use the strategy optimizer and how to create our own EA from a simple process featured in FT5.

In preparation for that I have asked members if they would oblige by looking at the typical spreads and rollover charges in their live accounts so that we can choose some real data with which to run representative back tests.

Please visit that thread and contribute, if you have a live broker account and know your spreads and rollover costs.

3 Likes

Hi Mondeoman,
Ever since I joined babypips.com forum and in all my inquiry of the internet for bits of information I have come across your post in this forum in regards to a journal using forex backtesting application, on a personal basis I am encourage on your scenario on forex tester 5 tool I have spent more than a few hours trying to use a software designed for automated and forex tester 5 tool for backtesting is faster, and easier to use thanks for your detailed review information on this cus I’ve been trying to find reliable trading, backtesting, and investing knowledge

1 Like

Hi @Forex_Swiz
Thank you for your kind words. I really want this to be useful to as many members as possible. I had intended to add another post to the thread by now but I realized last week that my own 2021 trading plan is so far behind that I have spent some time trying to align that plan with the progress on the FT5 testing.

It will not be long before my next post. :slightly_smiling_face:

4 Likes